A recent expedition was set up to explore some of the deeper wrecks here – the result of a WW1 game of cat and mouse. Picture by Chris Simons.
AFTER A LONG DRIVE through England and the picturesque countryside of Scotland, the ferry crossing from the mainland to St Margaret’s Hope was untypically calm. The weather around the Orkney Islands is known for being highly changeable even in the height of summer, but on this day the wind was light.


As we approached Stromness our charter boat, the Jean Elaine, was already being loaded with supplies of oxygen, helium and Sofnolime for the week’s diving. There was an air of anticipation on the boat as our 10 rebreather divers loaded up.
At dawn the next day, the expedition set off for Stronsay Island to the north-east of the Orkneys. Buoyed by tales of undived marks to explore, expectations were high, but there were no guarantees of success.
As early as 1912, the British Committee of Imperial Defence had foreseen the need to establish a naval blockade in the event of war with Germany. The English Channel, being comparatively narrow, could be covered without too many problems, but the broader waters of the North Sea required a more comprehensive system, combining barrage and patrol.
At the outbreak of war, a patrol was established between Shetland and Norway, and later extended to the Faeroes, Iceland and the Denmark Strait. This operation became known as the Northern Patrol.
So big was the area to be covered that the Royal Navy requisitioned a large number of merchant ships for patrol duty and, after 1916, armed all merchant vessels against the threat of surface U-boat attack.
 While some belligerent and neutral ships managed to run the blockade, many were intercepted and brought to ports such as Kirkwall, Orkney, for their cargoes to be examined.
With German sea-borne trade hampered, unrestricted submarine warfare against British and French shipping was declared in February 1915. A game of cat and mouse between the ships of the Northern Patrol and German submarines was to run its course until the end of the war.
One unfortunate ship to suffer from the U-Boat threat was HMS Duke of Albany. Built in 1907, she was listed as an Armed Boarding Steamer, but was torpedoed by the German submarine UB27 on 25 August, 1916.
UB27’s torpedo was effective, causing the ship to sink in fewer than 10 minutes. The initial strike killed many, and because the ship sank so quickly it was impossible to replace the catches on the depth-charges.
A court of enquiry later ordered that “when any vessel is in imminent danger of sinking, all depth charges should be rendered inoperative by inserting the safety catch, so as to prevent loss of life”.
The tragic deaths aboard the Duke of Albany almost certainly helped to save others in the years to come.
Today, the Protected Wreck of the 2184-ton HMS Duke of Albany lies in 65m of water. As we arrive at the dive-site, the wind is gusting a little but our dive boat remains steady. The skipper drops the shotline, and we wait for slack.
Chatter among the divers gradually subsides as a communal focus on the dive kicks in. Equipment checks take place quietly, with only the odd mick-take breaking into an increasing silence.
It’s interesting how quickly divers self-organise – one buddy-pair quickly volunteers to tie in the shot, another agrees to take down the lazy-line.
Others then wait quietly for their turn to be dropped into the water; a quick nod from the crew when it’s time to make their way to the boat jump-off point; a short, sharp “go” from the skipper and, after a timed interval, the orderly sequence of divers are in the sea, swimming the short distance to the shot.
Descending to the wreck, we leave our tags on the lazy-line, and don’t have far to go down before the outline of the wreck stretches out beneath us.
Our hearts beat faster now as the excitement picks up – it’s going to be a great dive! Below us, previous divers have stowed strobes on the shotline above the wreck, and they twinkle like an underwater Christmas tree.
 AS WE ARRIVE ON THE WRECK, we too add our strobes, and perform equipment status checks. At this point, it’s amazing how the air space in a rebreather mouthpiece allows for verbal utterances to communicate intentions under water. Strangely, it’s the slang-words that are the most readily understood!
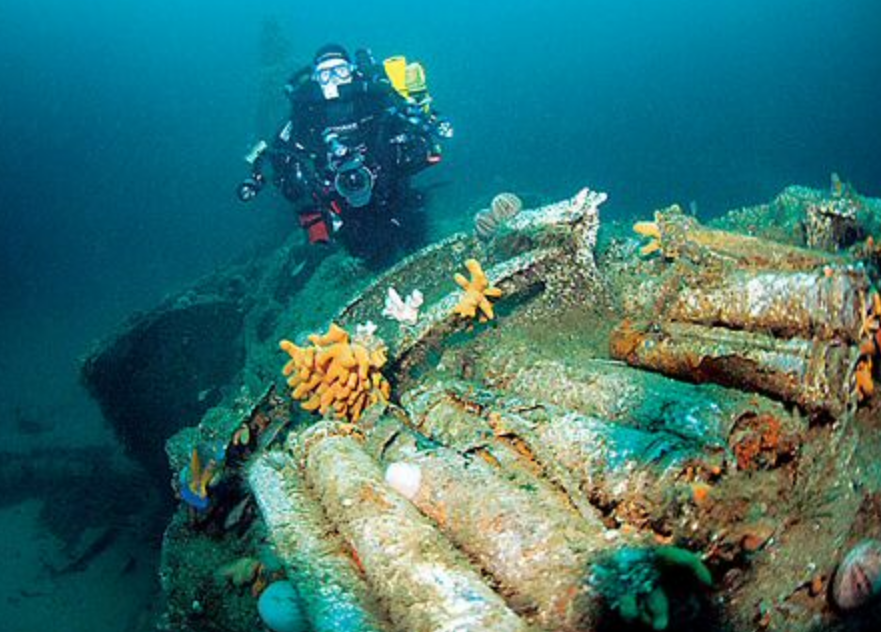
As we move off and explore the wreck visibility is excellent, with the white, sandy seabed helping to reflect ambient light. While the superstructure is now much flattened, the Duke of Albany’s three large boilers lie prominently on the seabed; the triple-expansion engine, which once propelled the ship at 22 knots, lies close-by.
The wreck is made even more fascinating because its Protected status ensures that great quantities of brass artefacts abound. Divers note in particular the bridge equipment and, elsewhere, ornate oblong portholes with what appear to be intricate, over-engineered ventilation gearings.
To complete the Northern Barrage, it was necessary for a team of minelayers to attach 100,000 mines to the seabed, using 80 million feet of cable.
On the afternoon of 7 September, 1918, one such minelayer, HMS Amphitrite, escorted by the M-class destroyer HMS Nessus, had finished laying mines east of Orkney. They were heading back to Rosyth naval base when they hit a fog bank, causing them to zigzag to avoid a U-boat engagement.
Nessus steamed in front of Amphitrite and was rammed, suffering severe damage to her engine-room. Despite efforts to save her, the damage was too great, and she sank.
Today the wreck of the 82m HMS Nessus lies in 67m of water. Arriving at the dive site, by now the divers are self-organised and pre-dive rituals are slick.
Once again, orderly pre-dive focus leads to dive excitement as we descend to the wreck, which shows a great deal of damage, the result both of the accident and the effects of the weather.
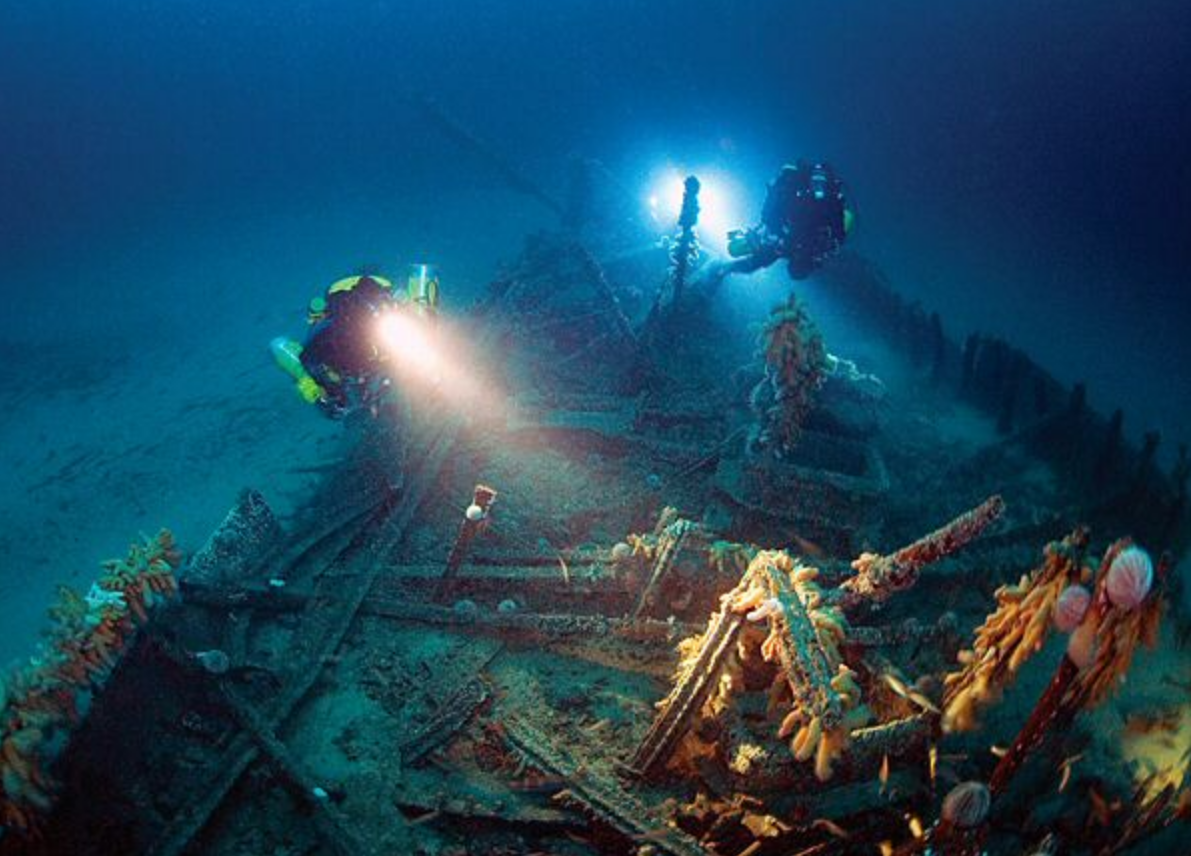
However, the wreck has many areas of interest; finning along the starboard, the 4in gun can be seen resting on the seabed, pointing out to sea, and a shell-case, complete with cordite, stands nearby. The wreck is festooned with gauges of all types and sizes, along with other munitions such as depth charges – a reminder of why this vessel was here in the first place.
It’s difficult to assess the effectiveness of the Northern Barrage, not least because it was still under construction as the war ended. However, records show that at least three, and more likely up to six, U-boats were sunk during WW1.
Two of these, U92 and U102, were discovered by Hydrographical Survey in 2006, possible having been sunk by mines laid by HMS Amphitrite.
 U102 today makes for a hugely exciting dive. Some hairy-backed divers may claim to be easily bored by diving submarine wrecks, but there’s nothing remotely dull about this sub, which now lies in 85m of water.
DESCENDING TO THE WRECK, so clear is the visibility on a white-sand seabed that the distinctive shape of the sub appears at about 60m. It’s beginning to register with us that the great diving gods of weather and visibility are being good to us on this expedition.
However, appreciation of the moment doesn’t detract from our focus as we settle on the seabed and scan around. A gaping hole astern of the conning tower is immediately apparent, perhaps where the mine impacted.
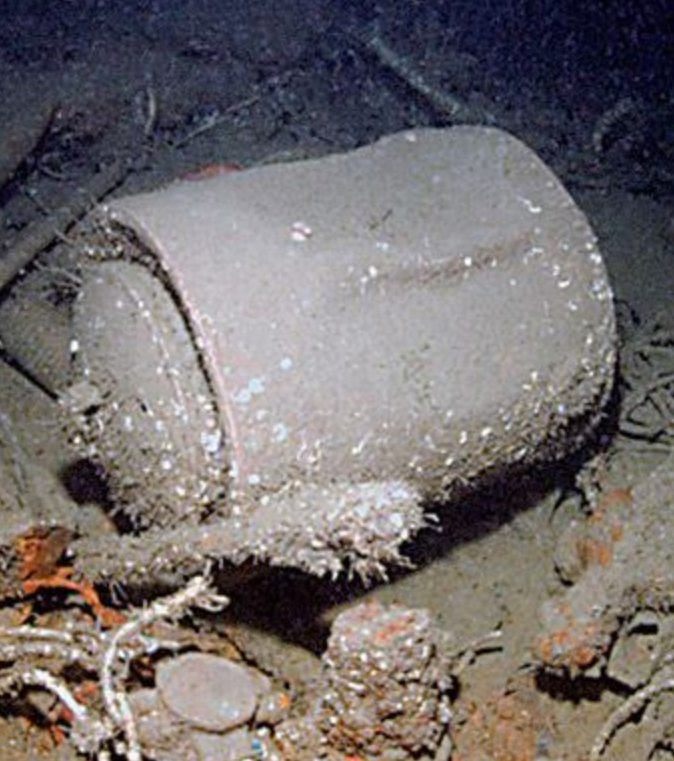
U102 still has its 105mm deck gun forward of the conning tower, and a 88mm deck gun aft. However, what makes this so intriguing is that shell-casings are strapped to the deck close to the guns, presumably to facilitate swift firing on surfacing.
On closer inspection, we see that the brass shells are encased in lead sleeves for waterproofing.
We move to examine the hole behind the conning tower, where a number of gauges can be seen. What makes this dive so fabulous is not just the amazing visibility and ambient light, but that the wreck reveals so much history of WW1 naval warfare in Orkney.
Our next dive sets out to explore another unknown mark, provided to us by local researcher Kevin Heath. It lies in the general proximity of U102 and U92; could it be one of the missing U-boats?
The image on the sounder seems to confirm it as a U-boat. The echo-sounder image reveals the conning-tower standing 5m proud of the seabed, the image so clear that even the stern gun can be seen.
 At 85m, we find out how wrong our initial assumptions were. The wreck of a 50m steam trawler stretches before us.
The “not-the-sub” wreck has sunk into the sand, but the hull is largely intact to the gunwales, and the single boiler and engine are clear to see.
Although we can safely confirm that this is not a submarine, we are no closer to establishing its identity.
Our last dive of the trip is to the wreck of an armed merchantman, Clan MacKinlay. Though built during WW1, this vessel survived the war, and was redrafted to active war service in WW2.
Unfortunately, she was sunk in November, 1940, either by a mine explosion or an air attack. At 6365 tons gross and 126m long, the wreck is a big lump, but once again lies on clean white sand that reflects ambient light at 70m.
It’s clear to us that storms have taken their toll over the years. As the wreck sinks slowly into the sand, it’s almost as if the sea is claiming her. Here and there definite pieces of superstructure, such as a hold derrick, stand out. So, following what could be a propshaft, we swim aft.
The stern is almost submerged in clean white sand to the gunwales, but there are two deck guns to see, one pointing upward, one drooping to the seabed – a sad sight, and a reminder of the conflict around the Orkney Isles.
AS WE FIN BACK TO AMIDSHIPS, the twinkling of the strobes on the shotline reassures. There is only five minutes of bottom time to savour, after what has been a memorable week’s diving.
We reflect on how excellent visibility, benign North Sea weather, and historic wrecks have all played their part. We didn’t want to come up from the dive!
Then, as if to round off the trip, a common seal swims by to investigate us, but won’t come too close. Perhaps the seal doesn’t see too many divers outside Scapa Flow, but as the secret gets out,
it may well see a few more in the future.
Our thanks to Dr Richard Osbourne for his historical research and archive photos, and to skipper Andy Cuthbertson for steaming many miles up to Stronsay Island and around the Orkneys, and giving us a solid dive platform in the North Sea.
Appeared in DIVER November 2010.
Pictures by Chris Simons and Rick Ayrton.